External Access
The previous lessons have introduced how to build the internals of components (e.g. service implementations) and how to build loosely coupled interactions based on explicitly defined required and provided services. There are some occasions where a more tight coupling is desired, e.g. when building a user interface for a specific component implementation. For this reason, Jadex provides mechanisms for accessing and manipulating internals of components.
Exercise F1 - Chat Bot
As a basis for the subsequent exercises in this chapter a new agent is used: the chat bot. It has the purpose to monitor chat messages and issue a reply message, whenever a chat messages contains a given keyword.
Defining the chat bot component
- Create a Java class file called ChatBotF1Agent.java and copy its content from the ChatD2Agent.
- Remove the required service definition of the 'clockservice' as it is not needed.
- Add two fields of type String named 'keyword' and 'reply'. These fields will control the behavior of the bot, i.e. to which messages it reacts (keyword) and which message it will issue in response (reply).
- We want these fields to be automatically injected from the component arguments, therefore add an '@AgentArgument' annotation to each.
- Add a corresponding get and set method for each field.
- Add an @Arguments annotation above the class definition as shown below. The arguments annotation defines which kind of arguments can be specified when starting the component. This information is e.g. used by the JCC allowing a user to enter argument values before starting a component.
@Arguments({
  @Argument(name="keyword", clazz=String.class, defaultvalue="\"nerd\"", description="The keyword to react to."),
  @Argument(name="reply", clazz=String.class, defaultvalue="\"Watch your language\"", description="The reply message.")
})
Defining the chat service of the chat bot
- Create a Java class file called ChatServiceF1.java implementing the IChatService interface.
- Change the chat service implementation class of the ChatBotF1Agent to refer to the new service.
- Add a field of type IInternalAccess called 'agent' and add a '@ServiceComponent' annotation for injecting the component (c.f., e.g. Exercise D2).
- Implement the message() method by checking if the received message contains the keyword as specified in the agent. If the keyword is contained, send the reply message concatenated with the name of the sender to all chat services (e.g. adapting the code from ChatGuiD2). You can access the keyword in the agent and check for containment as follows:
// Reply if the message contains the keyword.
ChatBotF1Agent chatbot = (ChatBotF1Agent)agent.getComponentFeature(IPojoComponentFeature.class).getPojoAgent();
if(text.toLowerCase().indexOf(chatbot.getKeyword().toLowerCase())!=-1)
{
  ...
}
Verify the Component Behavior
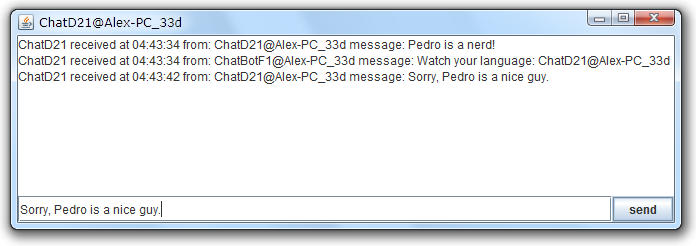
Start the chat bot and another chat agent (e.g. ChatD2). Enter and send a chat message containing the keyword. Observe that the chat bot will automatically respond to the message. Send another message without the keyword and observe, if the chat bot stays quiet. The conversation might look like shown below:
Exercise F2 - Component Viewer
In this exercise, we will create a user interface for the chat bot that can be accessed from the JCC.
Defining a Chat Bot User Interface
- Create a new Java class named BotGuiF2 and let it extend AbstractComponentViewerPanel from package jadex.base.gui.componentviewer. The component viewer panel is a mechanism used in Jadex to add user interfaces to components. These user interfaces can be accessed using the 'Component Viewer' tool of the JCC. The advantage of the mechanism is that it allows administering components on remote platforms, too.
- Implement the getComponent() method as required by the abstract superclass. This method should return a swing component (e.g. a JPanel) that represents the components user interface. The chat bot user interface should contain two text fields (JTextfield) for the keyword and the reply.
Defining a Chat Bot Component
- Copy the contents of the ChatBotF1Agent.java to a new ChatBotF2Agent.java and change the service implementation class to ChatServiceF2.
- Copy the contents of the ChatServiceF1.java to a new ChatServiceF2.java and change the occurrences of ChatBotF1 accordingly.
- Add a GuiClass annotation to the agent class pointing to the user interface implementation as follows:
@GuiClass(BotGuiF2.class)
Verify the User Interface
- Launch the Jadex platform and start the chat bot (F2).
- Switch to the component viewer tool and double-click on the ChatBotF2 component in the tree on the left (see below).
- The user interface will be displayed allowing you to enter keyword and reply.
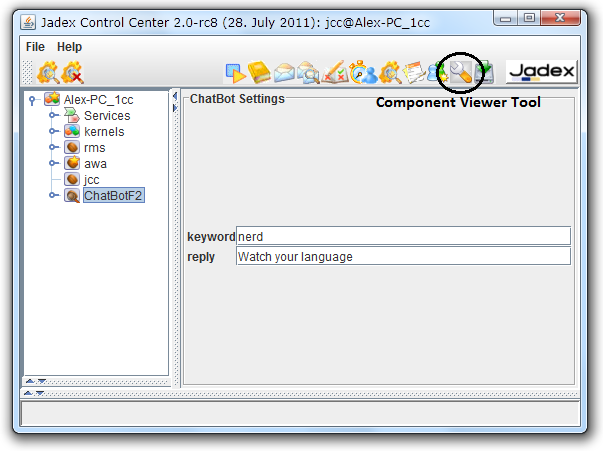
The actual look of the user interface largely depends on the Swing components and layout managers that you have used. E.g. in the screenshot a GridBagLayout and two labels in front of the text field were used, in addition to a titled border around the panel itself. Currently the user interface does nothing, when new values are entered. We will change that in the next exercise.
Exercise F3 - Scheduling Steps on Components
In Jadex, each component owns its own conceptual thread (provided by the platform whenever needed). The single-thread execution model of a component assures state consistency as the internal data structures inside a component are never accessed by two threads at once. For the chat bot user interface to work properly, it requires access to the keyword and reply values of the component. The user interface runs on the swing thread and therefore cannot access the component internals directly, as this would cause consistency issues due to concurrent access. This exercise shows how to schedule a step on the components thread and safely access the component internals.
Defining the User Interface
- Copy the BotGuiF2 contents to a new BotGuiF3.java file.
- Towards the end of the getComponent method, fetch the values of the reply and keyword properties from the component. Use the getActiveComponent() method already provided by the abstract component viewer panel to get hold of the IExternalAccess of the chat bot component. Schedule a step on the component and use the IInternalAccess to obtain the chat bot object. Get the reply and keyword values from the chat bot using the get methods and return a String array containing bot values. This result value is provided in the future return value of the scheduleStep() method.
getActiveComponent().scheduleStep(new IComponentStep<String[]>()
{
  public IFuture<String[]> execute(IInternalAccess ia)
  {
    ChatBotF3Agent chatbot = (ChatBotF3Agent)ia.getComponentFeature(IPojoComponentFeature.class).getPojoAgent();
    return new Future<String[]>(new String[]{chatbot.getKeyword(), chatbot.getReply()});
  }
})
- Add a result listener to the future returned by the scheduleStep() method call and set the obtained values in the GUI. Use a SwingDefaultResultlistener to have the code executed on the Swing thread to avoid GUI inconsistencies.
...addResultListener(new SwingDefaultResultListener<String[]>()
{
  public void customResultAvailable(String[] values)
  {
    tfkeyword.setText(values[0]);
    tfreply.setText(values[1]);
  }
});
- For reacting to changes add action listeners to the two text fields as shown below. In each action listener first extract the value from the text field and afterwards schedule a step on the component for setting the changed value by using the set method of the chat bot object.
tfkeyword.addActionListener(new ActionListener()
{
  public void actionPerformed(ActionEvent e)
  {
    final String keyword = tfkeyword.getText();
    ...
  }
});
Defining the Component
- Copy and edit the chat bot and chat service to create F3 versions and don't forget to change the GuiClass annotation in the chat bot to point to the new BotGuiF3.
Verify the User Interface
- Launch the Jadex platform and start the chat bot (F3).
- Open the user interface in the component viewer.
- Check if the initial values of the reply and keyword properties are correctly displayed.
- Change the reply and keyword properties by entering a new value and hitting return in each text field.
- Start a chat component and send some messages to verify that the chat bot settings have actually changed.
Exercise F4 - Scheduling Steps on Remote Components
Another advantage of the schedule step approach is that the developer can differentiate between code executed on the local platform and code that is executed on a potentially remote platform. Consider a situation where the user interface of the chat bot is on a different computer than the chat bot itself. With schedule step a developer specified a piece of code that may be transferred across the network and executed remotely.
When looking at the code from the last exercise (shown again below), you should be aware that the two inner lines are potentially executed in a different Java machine on a different computer. Therefore inside the execute() method you are not allowed to access fields or methods of the enclosing object, because it is not available at the remote side. One exception are final variables, which are automatically transferred over the network by the Jadex infrastructure.
getActiveComponent().scheduleStep(new IComponentStep<String[]>()
{
  public IFuture<String[]> execute(IInternalAccess ia)
  {
    // This code is executed on a potentially remote component.
    ChatBotF3Agent chatbot = (ChatBotF3Agent)ia.getComponentFeature(IPojoComponentFeature.class).getPojoAgent();
    return new Future<String[]>(new String[]{chatbot.getKeyword(), chatbot.getReply()});
  }
})
Accessing the chat bot from a remote platform
- Launch two Jadex platforms and start the chat bot (F3) on one of them.
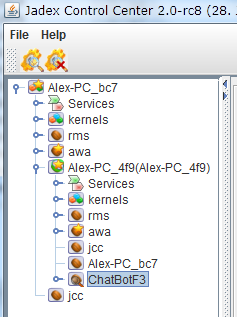
- Go to the component viewer of the other platform (not running the chat bot). This platform should automatically connect to the platform running the chat bot.
- Unfold the remote platform node and double-click on the remote chat bot to open its GUI (you may have to wait a little after opening the component viewer tool or the platform node due to inter-process communication). The GUI should behave exactly the same as in the local case.
- Check, if you can alter the keyword or reply property. If an exception occurs, you probably access part of the GUI (running on one platform) from the scheduled step (executed on the other platform). Make sure that you only access final variables inside the steps as follows:
keyword_textfield.addActionListener(new ActionListener()
{
  public void actionPerformed(ActionEvent e)
  {
    // Access GUI on local platform.
    final String keyword = keyword_textfield.getText();
    getActiveComponent().scheduleStep(new IComponentStep<Void>()
    {
      public IFuture<Void> execute(IInternalAccess ia)
      {
        // Use final keyword value on remote platform.
        ...

        return IFuture.DONE;
      }
    });
  }
});
Making the remote execution safe for different builds
When accessing the GUI remote you may have noticed the following message being printed to the console: Warning: Anonymous class without XML class name property (XML_CLASSNAME) / annotation (@XMLClassname): tutorial.BotGuiF3$1.
This warning indicates a potential problem due to the Java language specification not describing a naming scheme for anonymous inner classes. Each java compiler decides for itself how to name an inner class (typically OuterClass$1, OuterClass$2, ...). This can cause incompatibilities when two platforms communicate that have been compiled using a different compiler (e.g. javac vs. eclipse). To allow proper mapping of inner classes you can specify an additional identifier using the @XMLClassname annotation:
- Copy the F3 files into new F4 files, changing the all occurrences of F3 to F4 accordingly.
- For each inner IComponentStep class, add an @XMLClassname("some_identifier") annotation. Of course you should use different identifiers for each occurrence (three in total).
- Access the GUI remotely and check if the warnings have vanished.